Hosting a Web Application on AWS EC2

There are many ways to host a web application in an AWS environment. Your web application can be a traditional website or an API project. Both types will be referred to as "web app" from now on.
Introduction
There are many ways to host a web application in an AWS environment. Your web application can be a traditional website or an API project. Both types will be referred to as "web app" from now on. Some ways we can apply to host a web application on AWS are listed below:
- Hosting a web application in an S3 bucket
- Hosting a web application in ECS, EKS, or Fargate containers
- Hosting a web application with Elastic Beanstalk
- Hosting a web application directly on EC2
[!NOTE] Although options 1, 2, and 3 are modern approaches to hosting content on AWS, in this article we are addressing people who have worked a lot on legacy systems but want to migrate to the AWS environment with their old habits!Our aim is to quickly introduce the flow of Route53, Application Load Balancer, Security Groups, etc. together with EC2.
In this article, we will examine the last option. There are many operating systems that can be used on EC2. We will use the lowest configuration Linux available within the "Free Tier". Click here for more information about AWS Free Tier.
Amazon EC2 can be used directly to host a web application. In this article, all the steps required to accomplish such a task are explained step by step.
Background
What Will We Do?
The basic architecture can be as shown below:
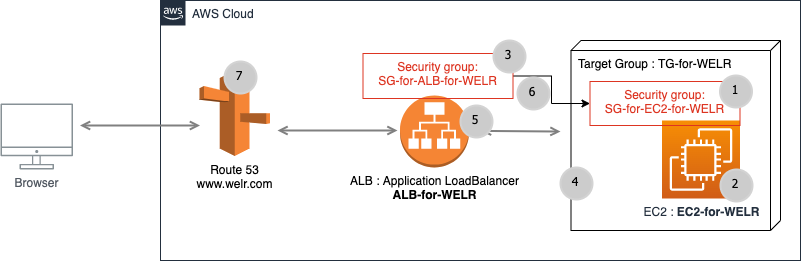
Image-001: Main system view
Let's say your goal is to host your website on an AWS EC2 machine. For the simplicity of the application, a static HTML page will be published on the Apache Web server on AWS EC2. We will make it possible to access Apache's default
www folder via FTP. In addition to these requirements, a domain name will be directed to this web application via AWS Route53.To design the architecture shown in Image-001, we will create AWS elements in the order of the numbers in the gray circles.
Let's say our domain name is
WELR.com and we want to host its working elements on EC2.All steps to host
WELR.com content on an AWS EC2 can be as follows.Step 1: Creating a Security Group on AWS
This security group will be used for EC2. A security group can be thought of as the firewall of the object it is attached to.
Set all inbound ports as shown below:
- 20-21 (FTP)
- 1024-1048 (FTP), optional
- 22 (SSH)
- 80 (HTTP)
- 8080 (HTTP custom), optional
- 443 (HTTPS)
The red rectangle in the image below is important in terms of showing the flow from ALB to EC2 through the relevant security groups.
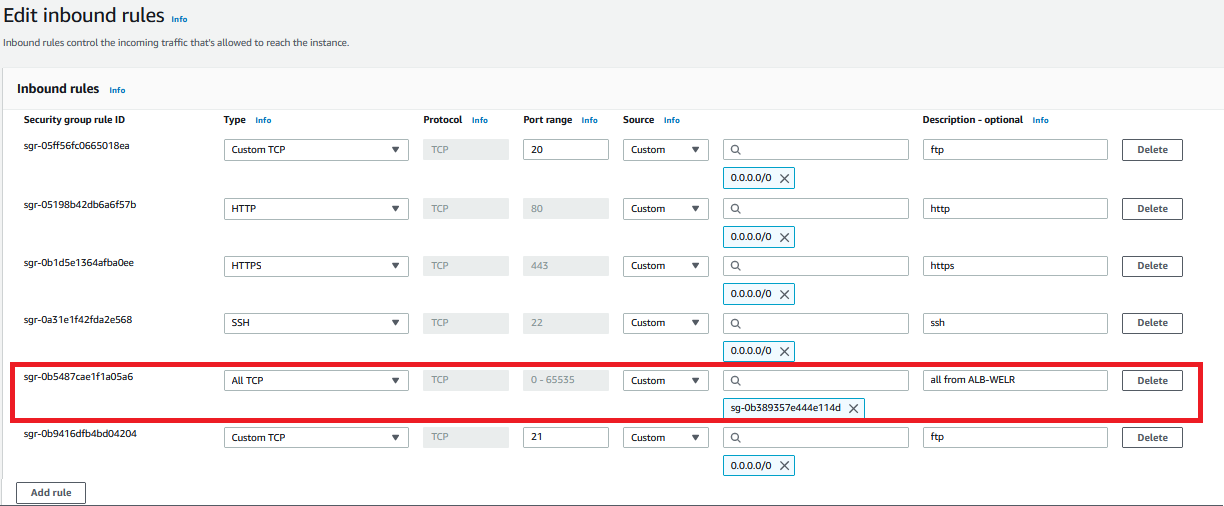
Image-002: Inbound rules of SG-for-EC2-for-WELR
Step 2: Creating an EC2 Instance
Creating an EC2 instance on AWS is a simple process. The Connect button in the upper right corner of the image below will be used to connect to EC2.
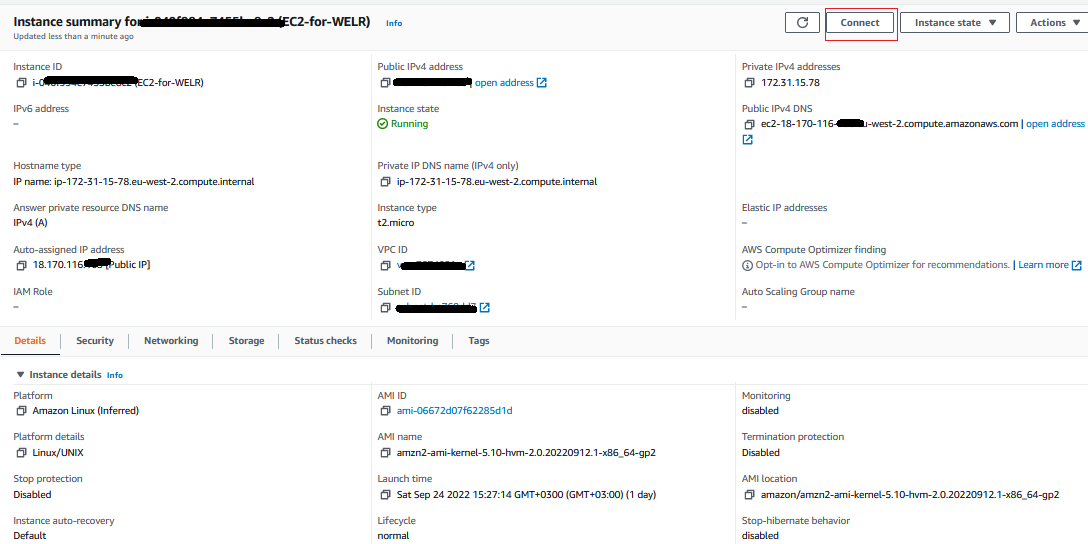
Image-003: EC2-for-WELR
Install all requirements on EC2-for-WELR.
First, you need to connect to the EC2 command line. There are many ways to do this step, but the simplest is to connect directly from the AWS web console.
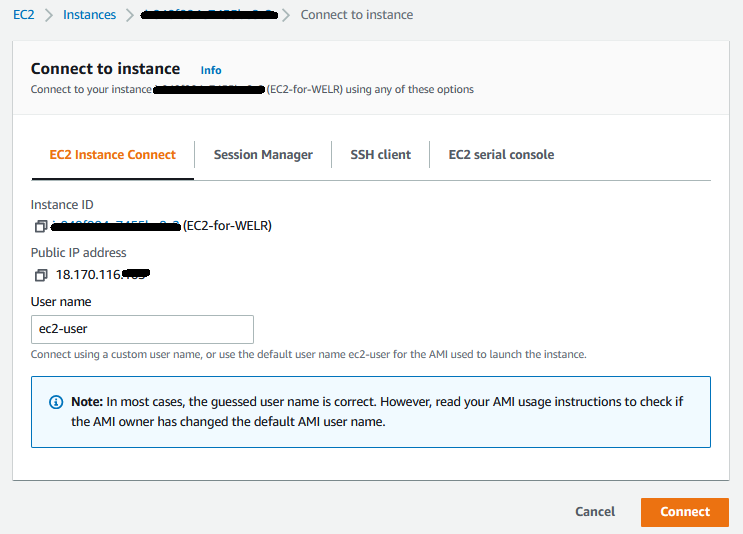
Image-004: Connecting to EC2-for-WELR
After pressing the Connect button, you will connect to the EC2 command line as
ec2-user.2.1- Apache Installation
TEXT
> sudo s
> yum update -
> yum install -y httpd.x86_6
> systemctl start httpd.servic
> systemctl enable httpd.service
All web application files will be in Apache's default web folder.
The default web folder for Apache is the
/var/www/html directory.2.2 - FTP Installation
TEXT
> sudo su
> yum update -y
> yum install vsftpd

> sudo vi /etc/vsftpd/vsftpd.conf
You need to make some changes shown below in the FTP configuration file.
All these lines must be present in the configuration file as shown. You need to know how to use the
vi editor. If you are going to use the vi editor for the first time, check here.TEXT
# remove the # signs from all of the following lines
anonymous_enable=NO
#
local_enable=YES
#
write_enable=YES
#
local_umask=022
#
dirmessage_enable=YES
#
xferlog_enable=YES
#
connect_from_port_20=YES
#
chroot_local_user=YES
write_enable=YES
allow_writeable_chroot=YES
#
listen=NO
#
listen_ipv6=YES
pam_service_name=vsftpd
userlist_enable=YES
tcp_wrappers=YES
pasv_enable=YES
pasv_min_port=1024
pasv_max_port=1048
pasv_address=18.170.116.xxx
To restart the
vsftpd service, one of the following can be used:TEXT
> /etc/init.d/vsftpd restart
OR:
TEXT
> systemctl restart vsftpd
To add a user for FTP, do the following on the EC2 command line:
TEXT
> adduser awsftpuse
> passwd awsftpuse
> usermod -a -G root awsftpuser
> usermod -d /var/www/html/ awsftpuse
> chown -R awsftpuser /var/www/htm
> systemctl restart vsftpd
2.3 - FTP Client Installation
For example, the Filezilla client on Windows.
After creating all elements on AWS, try connecting with an FTP client and uploading a file. You should be able to upload the
index.html file to the FTP web folder on EC2.Step 3: Creating a Security Group for ALB
Set all inbound ports as shown below:
- 20-21 (FTP)
- 1024-1048 (FTP), optional
- 22 (SSH)
- 80 (HTTP)
- 8080 (HTTP custom), optional
- 443 (HTTPS)
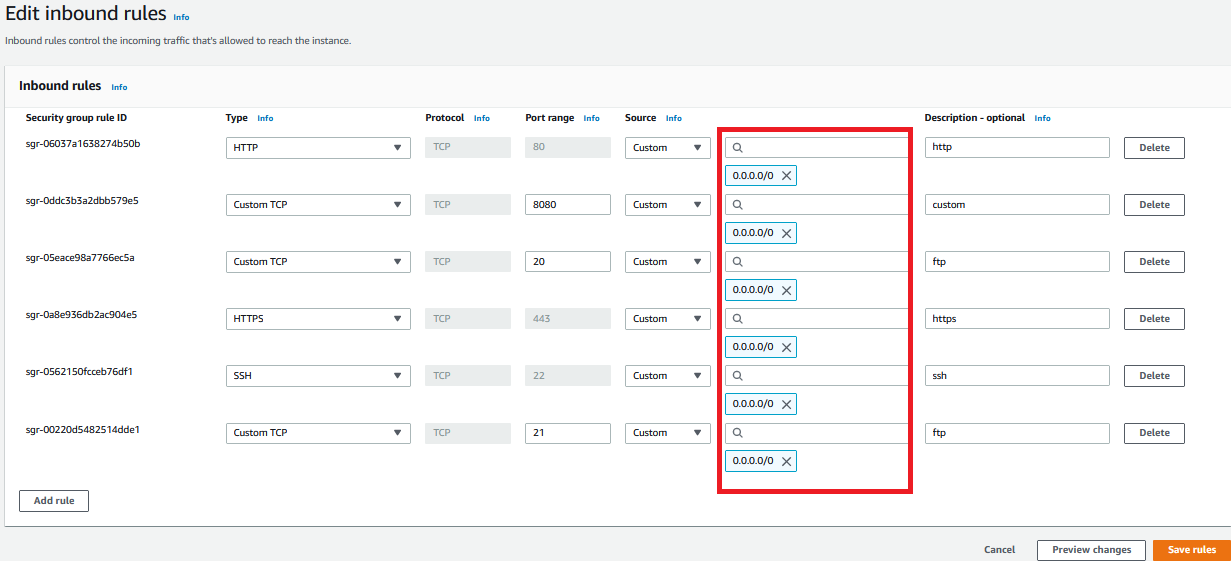
Image-005: Inbound rules of SG-for-ALB-for-WELR
Step 4: Creating a Target Group
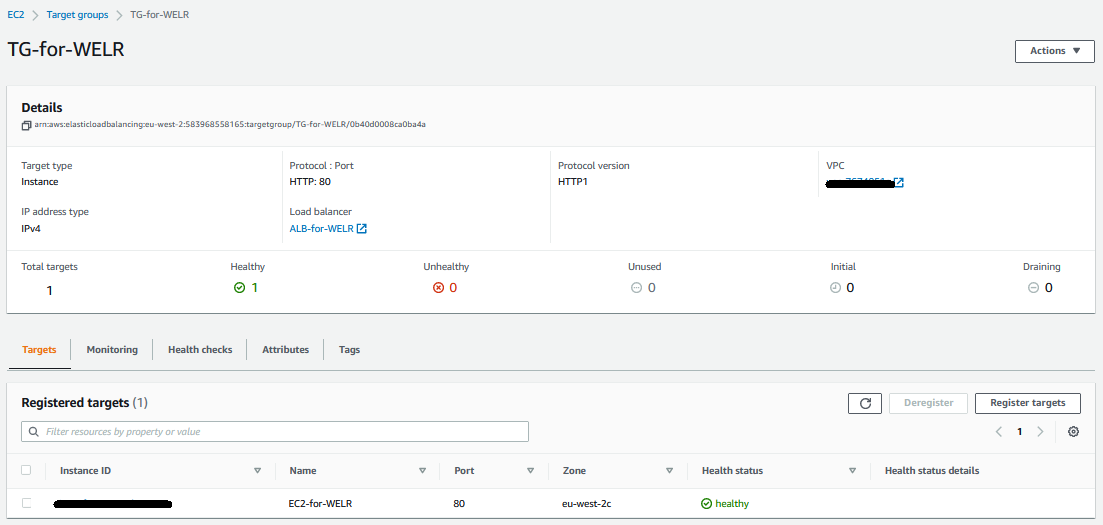
Image-006: Target Group TG-for-WELR
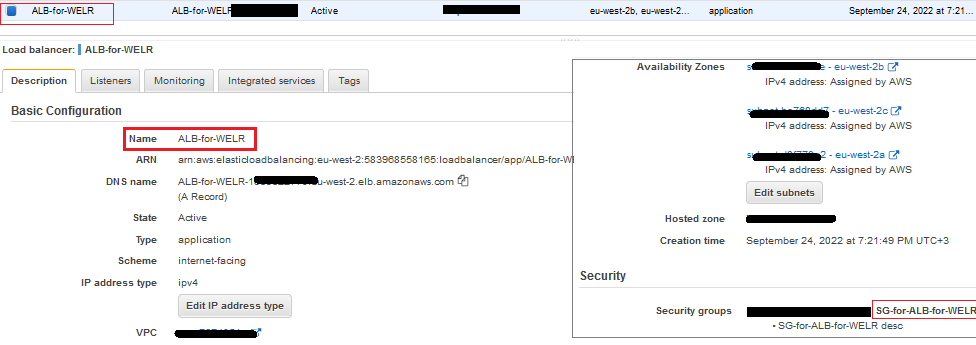
Step 5: Creating an Application Load Balancer
This ALB should have the
TG-for-WELR target group.Target group is a group of EC2s. However, for now, it only contains the
EC2-for-WELR instance.Additionally, this ALB should have the
SG-for-ALB-for-WELR security group.Image-007: Application Load Balancer ALB-for-WELR
Step 6: Permissions Between Security Groups
Add inbound rules to
SG-for-EC2-for-WELR to accept all TCP requests from SG-for-ALB-for-WELR.
Image-008: Allowing flow from ALB to EC2 through security groups
Step 7: Creating a Route53 Hosted Zone
It should have four records as follows:
- NS and SOA are created automatically
- Create Record A. As seen in the image below
- Create Record CNAME - for
welr.com
Image-009 - Route53 Records
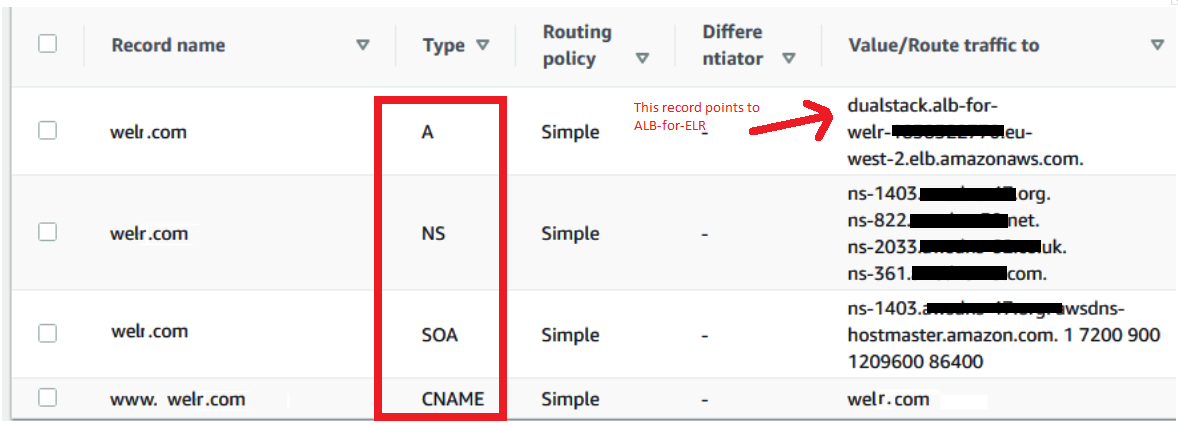
NS addresses can be used in the domain name management interface to direct the domain name to the web application hosted on EC2 Apache.
Conclusion
As stated at the beginning of this article, there are many ways to host a web application in any cloud environment. We made some examinations on AWS EC2. As seen, we assume that we manually deployed the working elements of the web application to Apache via FTP. However, with any CI/CD tool, this process can be automated using FTP commands.
The main purpose of this article is to show how to host a web application in an AWS environment on EC2 behind Route53 and Load Balancers.
What We Learned:
- Creating and configuring an EC2 instance
- Apache web server installation
- FTP configuration and adding users
- Security Group settings
- Application Load Balancer setup
- Domain redirection with Route53
☁️ Cloud Computing Services
We offer infrastructure design, migration, management, and optimization services on AWS, Azure, and Google Cloud platforms.
Explore Our Service📞 Contact Us
Get in touch with our team for detailed information about our AWS and cloud computing solutions.
Contact